Monday, 16 June 2014
Croqembouche Video
We made a project of making a Croquembouche by making some Choux Pastry filled with pastry cream. At first, we though that we could not make it into a good cromquembouche because there were lots of steps to make it. But we decided to finish it even though we felt were not going to make it. While my group were doing the recipe I was their camera girl. At first, it would be easy for me to just film and capture some of picture of them making croquembouche but I was wrong. Making croquembouche was not an easy recipe. We filled each Choux pastry with cream and dipped them into the caramel using a fork and stick on both sides. One of my groups got burned due to the hot caramel therefore we must be very careful to put all the choux pastry. But in the end, I was relieved because not only our video finished but also our croquembouche and I believe that ours was more look beautiful than other groups
Sunday, 11 May 2014
Buko Salad or Sweet Coconut Salad

Hello Everyone!
Buko Salad or sweet young coconut salad is a dessert dish. since It is my favorite Filipino dessert I will introduce to guys this magnifico recipe! This delicious dessert recipe use in every occasion in the Philippines, often serve in fiesta and birthday party. I often use this recipe whenever we do not have enough ingredient for other dessert recipe. Also, whenever my mother have no time to bake or cook to serve for our guesses she use this recipe because it's quick to prepare. This recipe is very simple but the more you put different ingredients the more pleasurable the buko salad is.
This dessert is really suits for this coming summer! Who does not like summer? Everybody love summer! Well not all of us. But here's two good thing about this dessert not only for people who love summer but also for the "hater" (including me). The good thing about this dessert is that it's healthy for your body. Fruits have vitamin C which very suitable for those people out there searching for dessert that have less calories! Also, it's really easy to make just like I said earlier, this recipe have similarity in Buko Pandan Salad but the only difference is that their flavor, that's it!
Aside from the ingredients that we used here, you can try adding more ingredients depends on your taste.
This Buko Salad and Buko Panda are the same but have different flavours. Just like what I said earlier, the more ingredients you put in Buko Salad, the more pleasurable it become while In
Buko Pandan you don't necessary need more flavours if you already have Pandan juice and Pandan paste.

It's yummy that makes my tummy sounds funny!
Here's my Buko Salad Dessert!
GOOD LUCK!
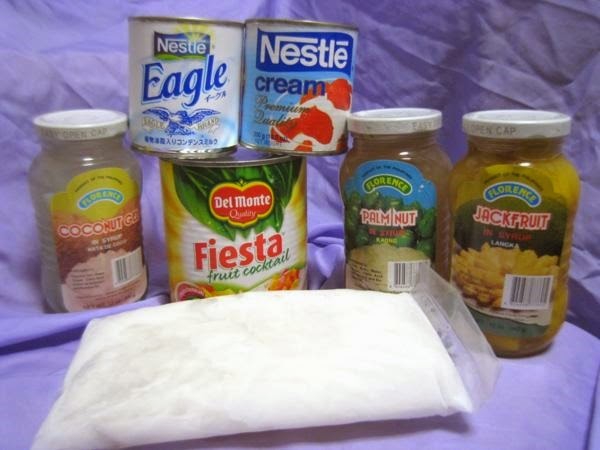
Ingredients for Buko Salad:
- 3-4 cups shredded young coconut (buko)
- 1 jar coconut gel (nata de coco), drained
- 2 cans of fruit cocktail
- 1 can condensed milk
- 1 ½ can all purpose cream
- A jar sugar palm fruit (kaong), drained
- 100gms. Raisins
- Pineapple slices
Let me know on comment below of what do you like about summer! Do you like it or not?
Friday, 11 April 2014
Mini Cake
#InsText
 |
| Hello Everyone!
In our spring bake sale, ,my
group and I made three layered mini cakes. It was a long process before my
group and I finished this lovely mini cakes. My group and I called it
three-layered-mini-cake, it was a long name but I think it was cool. Before we
come up with this type of cake, we basically had a hard time to make up with
our own idea for the bake sale. Then suddenly, I suggested to my group about
why not we make a three layered cake. Then, we both start to come up with
different kinds of suggestion for our bake sale. I had a good time making these
lovely cakes. We need to bake the layers
for the cakes first and make some custard butter cream for the icing. Then we
can start cutting the cake layers into circles and put some plastic strips
around to it. But when we ran out of icing, we decided to just mix some
different icing into the butter cream to pipe on top of the cake. And finally,
we finished our own cake. We felt so happy after we finished designing our
cakes.
|
Wednesday, 2 April 2014
Banana Chiffon Cake (Reflection)
Hi Princes and Princesses!
Let me tell you about my great adventure of making this master piece of mine... It started from Pandan chiffon cake but due to the lack of ingredients I decided to make Banana chiffon cake instead. I never regret making it because it was the best of the best cake I ever made. Note on that it was my first time to use another recipe cake from others.
Making this recipe was kind of hard (for me, maybe because i got pressured making it). I even accidentally mixed one of my classmate dry ingredient and I had to do it again! (Sorry Mrs. Harvey). But it turned out well, so it was worth it. I never thought that it would taste good as I imagined.

I was happy and felt satisfied. Banana chiffon cake was very challenging. One of my friend in my baking class told me that chiffon cake was very sensitive to make. Therefore, I must be careful making it. When I finished baking my cake, it was indeed perfecto! Then as I designing my cake into Winnie the Pooh using jelly. I often got mistake. It was very challenging for me because it was my first time designing a cake using piping jelly. There's a lot of design you can make for your own cake. I learned a lot of things by designing some cartoon characters, at first it might be scary to use jelly but its not. I learned how to transfer a character into my cake even though I often get mistake. But it never failed me to see the great result of my hard work!
And that's the story of how I make my Banana Chiffon Cake <3

This Banana Chiffon cake gives us potassium in our body. A healthy cake makes a body happy. Try Banana Chiffon cake, you will never regret making it because it bound to make our customers feel and taste heavenly!
Let me know if you ever make a chiffon cake. Do you like it? Let me know the comment below.
Here's the link for the ingredients that I used.
http://www.tasteofhome.com/recipes/banana-chiffon-cake
NOTE: If I have time to change or add recipe then it would be using honey for the jelly because the character of my cake is Pooh which is good to use honey for him. Also, maybe change the color of Pooh's bowl and make it into light brown color. But overall, I like the result of cake!
Monday, 17 March 2014
Buko Pandan Salad
This recipe is very easy to make and good for your throat to feel refresh from hot summer! Not only that you can make different kind of desserts in this recipe!

Buko Panda Salad is often serve in every occasions in the Philippines: fiesta, birthday party and etc. This recipe is very simple to make and quick to prepare. You can just put all the ingredients and eat it. But I prepare to put it in the refrigerator to make it cold and beat the summer heat! I do not like summer that's why this recipe is one of my favorite dessert.
In a small saucepan, bring your water to boil and pour in your uncooked mini Sago, simmer for 10 minutes. If Sago are already cooked, pour the contents of the saucepan through a sieve to strain out the hot water. Place your sieve and put the Sago in cold water then completely drain and let it cool off.


Cook your Pandan Gulaman or Jelly green as instructed in the packet directions, let it cool before cutting the jelly into bite size of cubes. Once Sago and Pandan Gulaman already been, use a big bowl and mix all the ingredients! Finally refrigerate it! I like cold Buko Panda Salad

Tada!!!
Our Buko Panda Salad
My grandmother is now currently in the Philippines and I asked her to buy me a pack of ice candy plastic before she comes here in Canada. Back home, ice candy was very popular in our school and I got an idea of why not put Buko Pandan Salad to Ice candy plastic so that I do not need to hold a bowl wherever I go! I cannot make Buko Pandan Ice candy for now because I have to wait for my grandmother! :( But I will try to find ice candy plastic in every Pilipino store in our area if they have it!
 |
| Ice candy plastic |
If you have this kind of plastic, aren't your lucky?

Ingredients:
Note: You can buy Pandan flavoured jelly in asian stores.
- 1 can (12.8 oz) of table cream
- 1 can condensed milk
- 1 1/2 cups coconut gel (nata de coco)
- 2 cans green gulaman jelly, or use 1 box green gulaman jelly
- 1 tsp pandan essence or not if you have already Pandan Flavoured jelly.
- 1/2 cup small sago (optional)
Procedures:
- In a strainer, drain the fruits or jar ingredients
- In a bowl, combine the buko and the rest of ingredients and mix well.
- Refrigerate before serving!
Monday, 10 March 2014
Cassava Cake

I saw this recipe on my auntie's book recipe and asked her to help me how to make Cassava. The reason why I wanted to make this cake so badly was because I often see this in Filipino Channel and it really made me curious about what was so good about this cake that they often shows it. When I was looking at the recipe I thought it was hard to make but then as my auntie's help and generosity she told me that it was easy. The recipe itself made you think it was hard to make but as you follow the procedure you will realize that it wasn't bad after all. So, I went to No Frill with my aunt to buy some of the ingredients for these recipe. I was so excited to make this Cassava cake and it's my first time to make this kind of dessert!
To make the cake base, preheat the oven to 350 F (180 C) and prepare your bowl.

Combine grated cassave, melted butter, condensed milk, evaporated milk, cheese, sugar, coconut and egg in a large bowl. Mix well.

Broil or 500F on top rack until the top turns golden or slightly burned. Approx 10-15 min. Make sure to watch the cake as it can turn brown quickly.

Finally, make sure to watch the cake as it can turn brown quickly. So happy of the result! I didn't burn my cassava cake and I bake it so perfectly! I love the taste of this when it's still hot.

But cool before cutting or serving because it's super hot. Good luck and Enjoy!
What was your first cake you made? Let me know in comment below.
Sunday, 9 March 2014
Red Velvet Cheese Cake

Last February, the month of love, our class made Valentines treats for the school.We made different kinds of dessert. The mini red velvet and rise cripes. The next day we made cheese cake! (I love cheese cake). Cheese cake and red velvet were my favorite cakes because of their tastes and colors. Suddenly it popped out to my head that why not combine my favorite red velvet and cheese cake together? It was very challenging for me to make red velvet cheese cake because I have no idea how to make it, I have no recipe to follow. Finally, I saw this recipe on the web while I was looking on the pictures of red velvet cheese cake. And because I'm so desperate to make this recipe I forced my mom to buy me at least 2 mini cheesecake pan. I know it was kind of expensive but what can I say I adore red velvet cheese cake. Then I went to buy all the ingredients that I need. I was so excited.
Preheat oven to 350. Combine Oreo crumbs and butter in a large bowl.

I place a heaping tablespoon of Oreo mixture into the bottom of a mini-cheesecake pan. Press down with your fingers to pack tightly.

Bake for 10 minutes, then I removed and let cool slightly.


Let them cool on your counter for at least 30 minutes. While these are cooling, you can get started on the delicious cream cheese frosting. You can't have red velvet without cream cheese! For frosting, use electric mixer, beat together the softened cream cheese and butter. Add vanilla and powdered sugar, and mix until smooth.

Never thought I can bake it perfectly! I love the combinations of red velvet and cheese cake together! I hope you'll try this at home!
Hope you like this recipe!
Good luck and Enjoy.
Here's the recipe
Mini Red Velvet Cheesecakes
Ingredients
For the crust:
- 12 pieces Oreo, crushed
- 3 tablespoons butter, melted
For the filling:
Yields: 24 mini cheesecakes
Total time: 25 minutes (plus 30 minutes to cool)
Total time: 25 minutes (plus 30 minutes to cool)
- 16 oz reduced-fat cream cheese
- 1 ¼ cup sugar
- 1 cup reduced fat sour cream
- 3 tablespoons Cocoa (NOT sweetened)
- 4 whole eggs
- ¼ cup heavy cream or half-and-half
- 2 teaspoons vanilla extract
- 1 teaspoon distilled white vinegar
- 1 oz red food coloring
For the frosting:
Yields: 1 1/2 cups frosting
Total time: <5 minutes
Total time: <5 minutes
- 4 oz reduced-fat cream cheese
- 2 tablespoons butter, at room temperature
- ½ teaspoon vanilla extract
- ¾ cups powdered sugar
Instructions
- For the crust: Preheat oven to 350 F. Combine Oreo crumbs and butter in a large bowl.
- Place a heaping tablespoon of Oreo mixture into the bottom of a mini-cheesecake pan. (If you don’t have one, you can use a muffin tray lined with muffin wrappers). Press down with your fingers to pack tightly. Bake for 10 minutes, then remove and let cool slightly.
- For the filling: Reduce oven to 325 F. Combine cream cheese and sugar in an electric mixer on medium speed. Add sour cream, cocoa, eggs, heavy cream, vanilla, and vinegar to combine. Carefully pour in red food coloring. Pour batter on top of Oreo crust and fill about 2/3 to the top. Bake for 20 minutes.
- The cheesecakes should be relatively firm. Let them cool on your counter for at least 30 minutes. While these are cooling, get started on the cream cheese frosting.
- For the frosting: Using an electric mixer, beat together the softened cream cheese and butter. Add vanilla and powdered sugar, and mix until smooth.
- Once your cheesecakes have cooled, you should be able to lift them from the tray without damaging them. If you’re using a mini-cheesecake pan, simply use your finger to pop the cheesecakes up from the bottom of the pan. Top each cheesecake with a tablespoon of cream cheese frosting.
Do you like Red velvet cake or Cheese cake? Let me know in comment below :)
Thursday, 6 March 2014
Comments about Mrs. Harvey's blog lists
As I look through Mrs. Harvey's blog, I found it interesting and enjoyable to look at. Looking in another blog gives me an idea and inspiration to make and improve my skills from baking. All the lists that Mrs. Harvey's made was indeed beautiful and attractive and the work that she have done and her students.

As her current students, I can say that her foods were delightful and tasty. I kept remember the things we have done last semester in her class. By looking at her blog brought the memories were enjoyed and fun baking sweet cakes, cookies and more!
Friday, 21 February 2014
Graham Cake Fruit Cocktail

Making Fruit Cocktail cake is one of my specialty, I often make this cake in every occasions: Birthdays, Holidays and in Anniversaries. Fruit Cocktail Cake has a taste of smooth graham crackers with tender juicy fruits. The condense/evaporated milk helps the crackers to smooth and with fruit cocktail you can taste the amazing combination of this ingredients. Using Fruit cocktail you can almost taste every fruits you can think of. One of my favorite is this Graham Fruit Cocktail Cake. The first thing I love about this unique cake is easy to make, you can make this at home without stressing how to make it and where to buy the ingredients, you only need condense, evaporated milk, graham crackers, and fruit cocktail. Everyone have this at home! And lastly, this cake has different kinds of fruit and color which your kids or anyone would love it. Children love colorful cake! Present this cake to your customers, they would love it, just like children who loves unique cakes. Customers often seeks for the best quality of the cakes. This cake is a good example, always fresh, healthy and taste good. We want our customer to be healthy and satisfied to the cake that they wanted. I started making it when I was 9 years old. It was my mom who taught me (since it was my favorite when I was a child).I love making it. If I wanted to improve this cake which it's not necessary because I am already satisfied with the taste of it but if I a chance to change or improve the cake more, I might combine the ice cream with flavor mango, vanilla, or strawberry on top of cake since it's fruit cocktail cake. I'd never try it before. It never crossed my mind to change or improve this graham fruit cocktail cake because it's our tradition of not changing or adding ingredients. Try experiment this cake or other foods you wanted to improve because I believe that life is like an experiment, the more you experiment the better.


Ingredients:
2 packs 200g Graham Crackers
4 packs 250ml Nestle All-purpose Cream
2 cans 168ml Alaska Condensada (Any condense Milk product)
1 medium can fruit cocktail, drained
2 7x4.5x3 inch pan or microwavable container
4 packs 250ml Nestle All-purpose Cream
2 cans 168ml Alaska Condensada (Any condense Milk product)
1 medium can fruit cocktail, drained
2 7x4.5x3 inch pan or microwavable container
Preparation and Cooking Procedures:
1. In a bowl, combine the all-purpose cream and condensed milk. Mix well.
2. Lay graham crackers in a pan.
3. Fill the spaces with crushed grahams.
4. Add around 1/4 inch thick layer of the cream mixture on top of the grahams.
5. Add in the fruits and add another layer of the cream mixture.
6. Repeat stacking the grahams, cream mixture, and fruits until you reach the top of the pan.
7. Pour in the rest of the cream mixture on top of the cake. You may choose to garnish the top with the fruit cocktail or crushed grahams.
8. Put it on the fridge and chill for around 30mins or an hour. Serve and enjoy!
Good luck
What kind of Fruit Cocktail cake do you often make? Share with me in the comments below.
<3 Princess Bakery
Subscribe to:
Comments (Atom)